

Local Development
Introduction
Section titled “Introduction”This guide walks you through starting LocalStack and deploying a serverless API consisting of a Lambda function and a DynamoDB table. You will perform the entire deployment on your local machine without an AWS account.
A successful deployment results in a:
- Serverless API: A Lambda function with a configured function URL.
- Persistence Layer: A DynamoDB table for message storage.
- Local Cloud Environment: A fully functional local sandbox that emulates AWS services.
Choose your preferred deployment method: Terraform or AWS CLI.
Prerequisites
Section titled “Prerequisites”- Docker engine installed and running.
- A LocalStack account and a valid LocalStack Auth Token.
- Either Terraform CLI or AWS CLI installed, depending on your preferred deployment method.
If you haven’t installed LocalStack yet, follow the installation guide to get started.
Step 1: Install and start LocalStack
Section titled “Step 1: Install and start LocalStack”Start LocalStack:
lstk startThe first run triggers a browser-based authentication flow. After authentication, the CLI pulls the LocalStack image and initializes the container.
When the container is ready, you will see the following logs:
✔︎ LocalStack ready (containerId: 400b3e61f3c6)• Endpoint: localhost.localstack.cloud:4566• Web app: https://app.localstack.cloudStep 2: Deploy the serverless API
Section titled “Step 2: Deploy the serverless API”You can deploy the Lambda function and DynamoDB table using either our AWS CLI wrapper lstk aws or our Terraform wrapper tflocal.
These tools automatically route AWS API calls to your LocalStack container, so you do not need AWS account credentials for this guide.
-
Create the Lambda function source. Execute the following to create a project directory, a function file and a Python handler:
Terminal window mkdir -p /tmp/localstack-democat > /tmp/localstack-demo/handler.py << 'EOF'import json, boto3, os, uuiddef handler(event, context):table = boto3.resource('dynamodb').Table(os.environ['TABLE_NAME'])method = event.get('requestContext', {}).get('http', {}).get('method', 'GET')# Function URL POST, or direct invoke (e.g. Resource Browser) with a messageif method == 'POST' or 'message' in event:data = json.loads(event.get('body', '{}')) if method == 'POST' else eventitem = {'id': str(uuid.uuid4()), **data}table.put_item(Item=item)return {'statusCode': 200, 'body': json.dumps(item)}result = table.scan()return {'statusCode': 200, 'body': json.dumps(result['Items'])}EOFcd /tmp/localstack-demo && zip handler.zip handler.py -
Create the DynamoDB table:
Terminal window lstk aws dynamodb create-table \--table-name Messages \--attribute-definitions AttributeName=id,AttributeType=S \--key-schema AttributeName=id,KeyType=HASH \--billing-mode PAY_PER_REQUEST -
Deploy the Lambda function:
Terminal window lstk aws lambda create-function \--function-name messages-api \--runtime python3.12 \--handler handler.handler \--zip-file fileb:///tmp/localstack-demo/handler.zip \--role arn:aws:iam::000000000000:role/lambda-role \--environment Variables={TABLE_NAME=Messages}lstk aws lambda wait function-active --function-name messages-api -
Configure a function URL and retrieve the endpoint:
Terminal window lstk aws lambda create-function-url-config \--function-name messages-api \--auth-type NONELAMBDA_URL=$(lstk aws lambda list-function-url-configs \--function-name messages-api \--query 'FunctionUrlConfigs[0].FunctionUrl' \--output text)echo $LAMBDA_URL
-
Create a project directory and a
main.tffile:Terminal window mkdir -p /tmp/localstack-democat > /tmp/localstack-demo/main.tf << 'TF'terraform {required_providers {aws = { source = "hashicorp/aws" }archive = { source = "hashicorp/archive" }}}resource "aws_dynamodb_table" "messages" {name = "Messages"billing_mode = "PAY_PER_REQUEST"hash_key = "id"attribute {name = "id"type = "S"}}data "archive_file" "lambda" {type = "zip"output_path = "${path.module}/handler.zip"source {filename = "handler.py"content = <<-EOFimport json, boto3, os, uuiddef handler(event, context):table = boto3.resource('dynamodb').Table(os.environ['TABLE_NAME'])method = event.get('requestContext', {}).get('http', {}).get('method', 'GET')# Function URL POST, or direct invoke (e.g. Resource Browser) with a messageif method == 'POST' or 'message' in event:data = json.loads(event.get('body', '{}')) if method == 'POST' else eventitem = {'id': str(uuid.uuid4()), **data}table.put_item(Item=item)return {'statusCode': 200, 'body': json.dumps(item)}result = table.scan()return {'statusCode': 200, 'body': json.dumps(result['Items'])}EOF}}resource "aws_iam_role" "lambda_role" {name = "lambda-role"assume_role_policy = jsonencode({Version = "2012-10-17"Statement = [{ Action = "sts:AssumeRole", Effect = "Allow",Principal = { Service = "lambda.amazonaws.com" } }]})}resource "aws_lambda_function" "messages_api" {function_name = "messages-api"runtime = "python3.12"handler = "handler.handler"filename = data.archive_file.lambda.output_pathsource_code_hash = data.archive_file.lambda.output_base64sha256role = aws_iam_role.lambda_role.arnenvironment {variables = { TABLE_NAME = aws_dynamodb_table.messages.name }}}resource "aws_lambda_function_url" "messages_api" {function_name = aws_lambda_function.messages_api.function_nameauthorization_type = "NONE"}output "function_url" {value = aws_lambda_function_url.messages_api.function_url}TFcd /tmp/localstack-demo -
Initialize and apply the configuration:
Terminal window lstk terraform init && lstk terraform apply -auto-approve -
Retrieve the endpoint:
Terminal window LAMBDA_URL=$(lstk terraform output -raw function_url)echo $LAMBDA_URL
Step 3: Test the API
Section titled “Step 3: Test the API”Send a POST request to store a message in the locally emulated DynamoDB table:
curl -X POST "$LAMBDA_URL" \ -H "Content-Type: application/json" \ -d '{"message": "Hello, LocalStack!"}'You will get back a response:
{ "id": "3e1b5cae-4386-447b-8567-f0615fdb0fff", "message": "Hello, LocalStack!"}Retrieve all your messages:
curl "$LAMBDA_URL"The Lambda function executes within the local environment and interacts with the locally emulated DynamoDB service. Because no actual cloud resources are created, you won’t incur any real AWS cloud costs or infrastructure changes.
Step 4: Inspect resources
Section titled “Step 4: Inspect resources”View the state of your local infrastructure via the LocalStack Web Application.
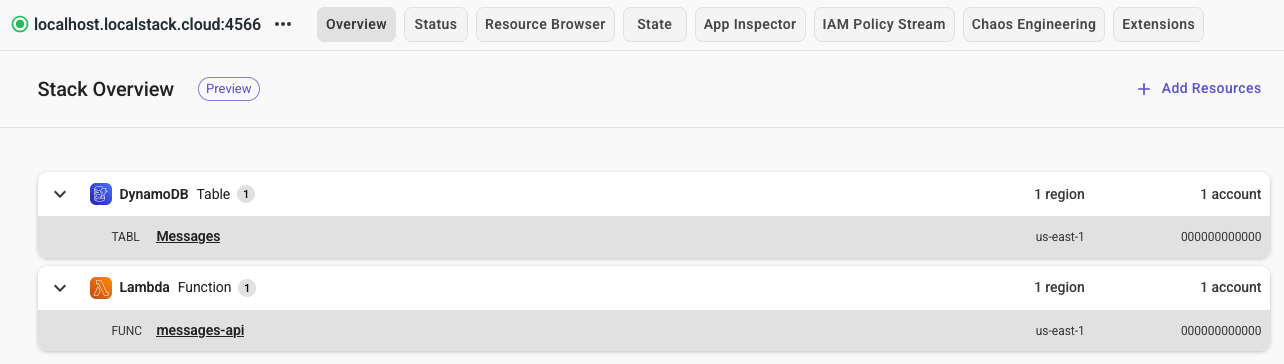
Navigate to the Stack Overview to inspect your running resources, which are the Lambda function and DynamoDB table you just deployed. You can expand each service to see the details of the deployed resources.
Step 5 (Optional): Continue with the Quick Start guide
Section titled “Step 5 (Optional): Continue with the Quick Start guide”There’s a lot more you can do with LocalStack than just emulate AWS services. To learn more about how LocalStack can help you inspect, manage, snapshot, and debug your AWS project, check out the local development quick start guide to continue the tutorial (be sure to skip the cleanup step below).
Step 6: Clean up
Section titled “Step 6: Clean up”Stop your LocalStack container to remove all emulated resources. LocalStack is ephemeral by default; stopping the instance clears the state.
lstk stopTo persist resource state, like S3 buckets or DynamoDB tables, across restarts, check out our state management tools.
Remove the local files you created in this guide:
rm -rf /tmp/localstack-demoNext steps
Section titled “Next steps”You have successfully deployed and tested a serverless API on your local workstation. Proceed to the CI/CD guide to learn how to integrate LocalStack into your automated continuous integration (CI) pipelines across a wide range of providers and platforms.